
Lesson Plan: Unit - 02 Microsoft Office

Subject: BELE2CFA: Computer Fundamentals And Applications
Topic of Study: Insert Shapes, Image and Table with its operations
Grade/Level: Bachelor of SCIENCE
Objective: To demonstrate and explain various options of Shapes, Images and Table & its options in MS-Word 2010
Time Allotment: 40 Minutes13.0.1 Shape
- It is used to insert ready made shape into document.
- Here, lots of varieties to draw a shapes in document.
- Example:
- Lines
- Rectangle
- Basic Shapes
- Block arrows
- Equation shapes
- Flowchart
- Star and Banners
- How to draw shapes in Ms-Word 2010.
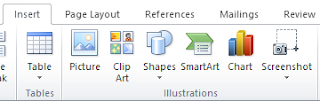
- Step 1: Click on Insert menu / ribbon.
- Step 2: Select shapes options. It will open a drop down box.

- Step 3: Select the shape and hold left button of mouse and drag it as per need.
- Step 4: Release the mouse button.
- Note: It has eight sizing handler (Light White Color) - to control the size of shapes.

- Note: It has one rotate handler (Green Color) - to rotate the shapes.
13.0.2 Image
- It is used to insert an image from computer system.
- Here, you can apply several style, border on it.
- How to insert image in Ms-Word 2010.
- Step 1: Click on Insert menu / ribbon.
- Step 2: Select the Image option, Click on it and it will open a insert picture dialog box.

- Step 3: Select the appropriate location to select picture. Exa. My Pictures
- Step 4: Select the Picture and Click on Insert button.

13.0.3 Insert Table and its operations
- Table is made from cross format rows and columns.
- Row is a horizontal shape in table.
- Column is a vertical shape in table.
- It is used to present a numerical data / information in tabular format.
- How to insert Empty table.
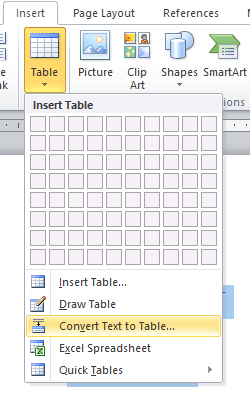
- Step 1: Click on Insert Menu / Ribbon.
- Step 2: Select the Table options.
- Step 3: Select the row and columns using mouse. For Example: 5 rows and 5 columns.

- Step 4: Table was ready and Insert data as per need.
- How to convert Text into Table.
- Step 1: Write a following text and put tabs between them (in words)

- Step 2: Select the Text.
- Step 3: Click on Insert Menu and Select Table Options.
- Step 4: Select "Convert Text to Table" options.
- Step 5: Based on selected text, a dialog box appear with default value. (if want to change then you can change it as per need)

- Step 6: Click on OK button and it will convert text to table.

- How to apply Design (Style) on Existing Table.
- Step 01: Select the Table using mouse at left side corner with four arrows options.

- Step 02: Click on Design Tab / Ribbon under the Table tools menu.
- Step 03: Select or move mouse on favorite design - it will apply on selected table.

- Step 04: Now, your table look like as...

- How to insert row / column / cell in existing table.
- Cell:
- Step 01: Set the cursor where you want to insert cell. Right click on it and select the Insert Cells from Insert options.

- Step 02: It will display small dialog box... (Cell Right/Down)
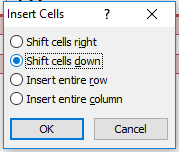
- Step 03: Select any one radio button - it will works as per name.

- Row: You can insert row above or below.
- Step 01: Set the cursor where you want to insert row. Right click on it and select the Insert rows options from Insert options.

- Step 02: Select Insert row above or below option.
- Step 03: It will works as per name and look like as...

- Column: you can insert column left or right.
- Step 01: Set the cursor where you want to insert column. Right click on it and select the Insert column to left or right options from Insert options.

- Step 02: Select Insert column to left or right option.
- Step 03: It will works as per name and look like as...

- How to delete cell / row / column.
- Step 01: Set the cursor and right click on it.
- Step 02: Select the option from small dialog box.

- Step 03: It will delete cell (left or right) / entire row / entire column as per your selection.