
Lesson Plan: Unit - 02 Microsoft Office

Subject: BELE2CFA: Computer Fundamentals And Applications
Topic of Study: Mail merge and Macro
Grade/Level: Bachelor of SCIENCE
Objective: To demonstrate and explain various options of Mail merge and Macro features in MS-Word 2010
Time Allotment: 60 Minutes12.0 Mail merge, Macro
- Mail Merge is special features to send same kind of letter to different receipt.
- Example: A birthday card sending to different friends with individual address.
- Macro is a special feature to execute series of commands using a single click or command.
12.0.1. Mail Merge.
- How to perform Mail merge in MS-Word 2010.
- Write a letter or application like below sample.
 |
| Figure 12.0.1_A Sample Letter |
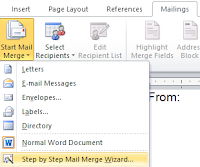
- Select the Step by step mail merge wizard from Start Mail merge option under the Mailings menu or ribbon.
 |
| Figure 12.0.1_B Step by Step Mail Merge Wizard option |
- Now, you have to perform Six steps.
- Step 1:Select the document type. Here, we select the letters and Click Next hyperlink.
 |
| Figure 12.0.1_C Step 1 Select the Document Type |
- Step 2:Select the starting document. Here, we select use the current document and Click on Next hyperlink.
 |
| Figure 12.0.1_D Step 2 Select the starting Document |
- Step 3: select the recipients using existing list or create new list. Here, we will use existing list.
- Step 3.A: Open MS-Excel 2010.
- Step 3.B: Write a content like below and save as Address.xls
 |
| Figure 12.0.1_E Prepare Data source |
- Step 3.C: Exit from MS-Excel 2010.
- Step 3.D: Click on Browse hyper link.
 |
| Figure 12.0.1_F Select the Data receipt using Browse option |
- Step 3.E: Select Address.xls from your appropriate place.
 |
| Figure 12.0.1_G Select the address.xls |
- Step 3.F: Select the table from dialog box.
 |
| Figure 12.0.1_H Select the table or sheet |
- Step 3.G: Select the recipient names & details or you can make other operations, also.
 |
| Figure 12.0.1_I Select the recipient list |
- Step 3.H: the step-3 dialog look like this.
 |
| Figure 12.0.1_J Option change in Step-3 dialog box. |
- Step 4: Write your letter - this step already finish.
 |
| Figure 12.0.1_K Write a letter |
- Step 4.A. Set the cursor in document and click on appropriate Insert Merge Filed from Mailings menu or ribbon.
 |
| Figure 12.0.1_L Select the merge fields. |
- Step 4.B. Repeat step 4.A as per your need / requirement.
 |
| Figure 12.0.1_M Place the merge fields in document. |
- Step 4.C now this letter look like...after the finishing step 4 and Click on Next hyperlink.
 |
| Figure 12.0.1_N Sample letter after Step-4 |
- Step 5:Preview your letter and immediately it will the preview of first receipt record in the document.
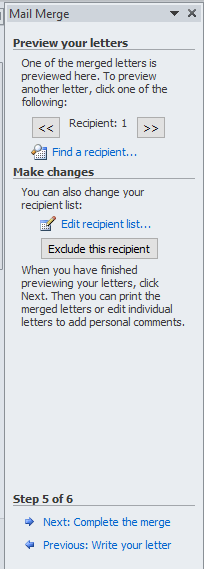 |
| Figure 12.0.1_O Preview the letter |
- Step 6: Complete the merge step has two options.
- You may print all letter using printer.
- You may edit individual letter as per need.
 |
| Figure 12.0.1_P Final step of mail merge |
- Step 6.A. Select Edit individual letter and it will display dialog box.
 |
| Figure 12.0.1_Q Edit the individual letter |
12.0.2. Macro
- A macro is an automated input sequence that will record each action that perform by user.
- A macro is typically used to replace a repetitive series of keyboard and mouse actions.
- How to perform in MS-Word 2010.
- Record a Macro
- Step 1: Select the Record macro from Macros options under View menu / ribbon.
 |
| Figure 12.0.2_A Record Macro options |
- Step 2: Give the name of macro For Example: LearnMacro and Click OK
 |
| Figure 12.0.2_B Name of Macro dialog box |
- Step 3: Now, your recording is on - please, to do some operation like bold, italic and underline and other formatting options on selected text.
- Run a Macro
- Step 1: Select the Text / String.
- Step 2: Select the View macro from Macros options under View menu / ribbon.
 |
| Figure 12.0.2_C View macros option |
- Step 3: Select the recorded macro or search your macro name from list. For Example: LearnMacro
 |
| Figure 12.0.2_D Select the recorded macro name |
- Step 4: Click on run.
Tags:
Mail merge and Macro